Multi-Chain Support
Multi-Chain Support
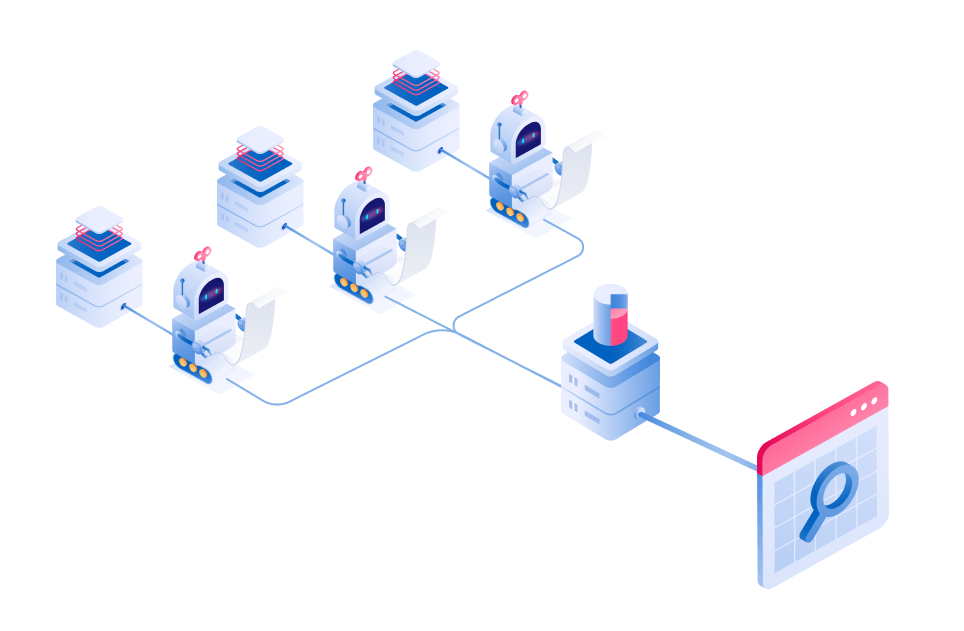
Multi-chain indexing allows you to index data from across different networks into the same database, this allows you to query a single endpoint to get data for all supported networks.
You can use the same SubQuery project, which includes the same GraphQL schema and mapping files to achieve this. It means that SubQuery is truly a write once, run anywhere multi-chain indexer.
For example, you could capture XCM transaction data from all Polkadot parachains or monitoring IBC messages across Cosmos Zones in a single project, with a single database, and a single query endpoint.
How it Works
You can enable this feature by adding the --multi-chain argument to the node (you can do this in the docker-compose.yml or when running via command line), this must be done from the start, otherwise you will need to delete and reset your database.
SubQuery will create an individual indexing node for each chain that you index in your SubQuery project. All multi-chain projects must point to the same GraphQL schema, ensure that they reference the same file in the individual project.ts.
Finally, the projects should index and save data to the same PostgreSQL database table schema. This will be set in your docker-compose.yml with the line --db-schema=<enter-common-schema-name-here>. You will need to add this same argument if you are running your project via the command line.
In our example project, we have altered the standard docker-compose.yml to automatically provision two indexing nodes, one for each chain that we are indexing. This is a suggested approach to speed up development.
  ...
  subquery-node-polkadot:
    image: onfinality/subql-node:latest
    ...
    command:
      - -f=app/project-polkadot.yaml
      - --multi-chain
      - --db-schema=multi-transfers
      - --disable-historical
    ...
  subquery-node-kusama:
    ...
    command:
      - -f=app/project-kusama.yaml
      - --multi-chain
      - --db-schema=multi-transfers
      - --disable-historical
    ...
Warning
This feature is not compatible with Historical State and will be disabled if --multi-chain is used.
Initialising and creating a multi-chain project
Creating a multi-chain project involves several steps that enable you to index multiple networks into a single database. This is achieved by configuring a multi-chain manifest file, generating required entities and datasource templates, adding new projects to the manifest, and publishing the multi-chain project.
See a real world example
You can see an example project with all of this correctly enabled here
1. Create a Multi-Chain Manifest File
Create a multi-chain manifest file (whose default name is subquery-multichain.yaml) in your project folder. This file should contain a list of the individual chain manifest files that you want to include in the multi-chain project. For example:
specVersion: 1.0.0
query:
  name: "@subql/query"
  version: "*"
projects:
  - project-acala.yaml
  - project-astar.yaml
  - project-moonbeam.yaml
  - project-moonriver.yaml
2. Generate Required Entities, Datasource Templates, and ABIs
Use the subql codegen command to generate the required entities, datasource templates, and ABIs for all the projects listed in the multi-chain manifest file. By default, the codegen command will look for subquery-multichain.yaml if no multichain file is explicitly mentioned through -f flag If you have @subql/cli version 5.0.0 or above, you will need to install @subql/common-ethereum package in the dependencies before execute this command.
3. Add a New Network to the Multi-Chain Manifest
Use the subql multi-chain:add command to add a new network to the multi-chain manifest and automatically generate a new manifest (project-newchain.yaml) and Docker service (in docker-compose.yml) for the chain.
Example:
subql multi-chain:add -f subquery-multichain.yaml -c project-newchain.yamlThis command adds project-newchain.yaml to the subquery-multichain.yaml manifest. It both introduces the new chain and integrates the necessary GraphQL schema into its corresponding project-xxxx.yaml file, a critical step for ensuring the proper functioning of multi-chain indexing.
This command also updates docker-compose.yml with the new service. All projects must index to the same PostgreSQL table schema, this is set in your docker-compose.yml:
subquery-node-newchain:
    image: onfinality/subql-node:latest
    ...
    command:
      - -f=app/project-newchain.yaml
      - --multi-chain
      - --db-schema=multi-transfers
      - --disable-historical
4. Publish the Multi-Chain Project
Use subql publish command to publish all the projects listed in the subquery-multichain.yaml manifest to a single IPFS directory.

See the Example Project
The repository for this example can be found here, it is an example of a multichain project that indexes multiple networks (in this case Polkadot and Kusama) into the same database.
A modified docker-compose.yaml file has been included, with two subql/node images, one for each network being indexed. You will notice that that each image maps to a separate manifest file (see command line references).
This multi-chain project can be started regularly by following the Readme.md.
Tips
In the upcoming sub-sections, we will outline valuable tips for developing multi-chain indexers.
Addressing ID Collision Concerns with Network Prefixes
When writing your mapping handlers you should account (or prevent) ID collision. If you think this could be a possibility, it is recommended that you prefix your IDs with the network name/ID.
You can get the network through the global chainId value. This is the same value as specified in the project manifest.
// We prefix the ID with the network name to prevent ID collisions across networks
const transfer = new Transfer(
  `${network}-${event.block.block.header.number.toNumber()}-${event.idx}`,
);
It can also be helpful to save all entities with a property indicating the source network so you can filter like below:
query {
  transfers(filter: { network: { equalTo: "polkadot" } }) {
    nodes {
      id
      blockNumber
      network
      amount
    }
  }
}
Handling Network-Specific Logic
Try to share as much logic as possible across networks, but if you want to determine exactly where the event/transaction/extrinsic/block originated from you will want to define a network specific mapping handler as it's hard to derive exactly what network each input comes from from the input itself.
// We have two handlers here to allow us to save the correct source network of the transfer
export async function handlePolkadotEvent(e: SubstrateEvent): Promise<void> {
  await handleEvent(e, "polkadot");
}

export async function handleKusamaEvent(e: SubstrateEvent): Promise<void> {
  await handleEvent(e, "kusama");
}

async function handleEvent(
  event: SubstrateEvent,
  network: "polkadot" | "kusama",
): Promise<void> {
  // Do something with shared logic
}
In many cases, you will have a completely different set of mapping handlers to deal with the differences of each network/chain that you are indexing.
Cross-Chain Race Conditions
If you are intending to mutate data across chain, e.g. an action in one network will affect an entity saved from another, then please be aware that SubQuery provides no guarantees of cross-chain ordering.
For example, one chain may index much faster than the other, and when indexing a cross-chain transaction, indexer B may encounter the receipt of this transaction on chain B well before the indexer A encounters that the transaction has been sent on chain A.
We suggest designing your entities to avoid or handle cross-chain race conditions so that chain B can safely record the receipt of the transaction without requiring that chain A has already recorded that the transaction has been sent.
Querying Metadata
When enabling multi-chain indexing, SubQuery will create multiple metadata tables for each chain that you index. You can individually query these metadata tables using GraphQL using the chainId of the particular network (see more below).
When querying metadata using GraphQL with multi-chain enabled, you need to pass the chainId (this is set in your project.ts) as shown below:
  query {
    _metadata(chainId: '0x91b171bb158e2d3848fa23a9f1c25182fb8e20313b2c1eb49219da7a70ce90c3'){
      lastProcessedHeight
      targetHeight
    }
  }
To query metadata from all metadata tables you can use the query shown below. There are no arguments in this query, so you cannot filter or sort.
{
  _metadatas {
    totalCount
    nodes {
      chain
      lastProcessedHeight
    }
  }
}