Node Operator Security Guide
Node Operator Security Guide
Node Operators serve as the backbone of the SubQuery Network. They undertake the arduous task of running intensive indexing jobs and offer query services to the public.
Ensuring the security of Node Operators is paramount, not only in the traditional infrastructure domain but also in the realm of web3.
Potential Risks for Node Operators
- Loss of funds from the controller wallet.
- Unauthorised activities of Node Operators on the SubQuery Network executed via the controller wallet.
- Phishing schemes targeting the Node Operator admin console, posing threats to the primary Node Operator wallet.
- System compromise, resulting in the Node Operator's machine being hijacked by malicious actors.
- Risk of data corruption, physical hardware damage, and ransomware attacks.
Architecture & Attack Vectors
The diagram below illustrates a suggested network topology of the Node Operator's infrastructure. It's crucial to understand the architecture to identify potential security threats and vulnerabilities.
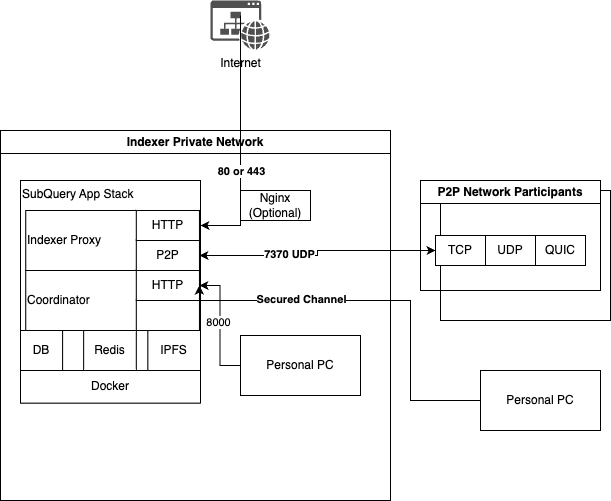
Ports and Interfaces
443 / 80: For nginx → indexer-proxy for HTTPS/HTTP Node Operators. If nginx is used, consult the official docs for security controls
8000: This port is designated for administrative purposes only and MUST NOT be exposed to the public. This port should be configured to only allow access from your own IP address or via your secured VPN as it is used by indexer_coordinator. Establish Firewall rules to safeguard this port:
- If operating on public clouds, refer to the respective security group settings in their documentation.
- If running on bare metal and directly exposed to the internet, consider using tools like
ufw/ufw-docker. - If running from home, use router's settings and only open 433/80 via port forwarding.
Setting up ufw-docker
Download `ufw-docker`` script:
sudo wget -O /usr/local/bin/ufw-docker https://github.com/chaifeng/ufw-docker/raw/master/ufw-docker
sudo chmod +x /usr/local/bin/ufw-docker
Then using the following command to modify the after.rules`` file of ufw``
ufw-docker installExpose the port 7370:
ufw route allow proto udp from any to 172.18.0.10 port 7370 comment 'allow indexer_proxy 7370/udp indexer_services'Expose the port 8000 allow Only My IP (change 192.168.10.1 to your IP Address):
ufw route allow proto tcp from 192.168.10.1 to 172.18.0.28 port 8000 comment 'allow indexer_coordinator 8000/tcp indexer_services'Tip
You can find IPAddress Mapping ex 172.18.0.10, 172.18.0.28 with
docker inspect -f '{{range .NetworkSettings.Networks}}{{.IPAddress}}{{end}}' <container_id_or_name>Show the current firewall allowed forward rules
ufw-docker status:::
7370: This port is generally safe to allow outbound and inbound traffic for Node Operators proxy p2p network
Docker
The Coordinator has unrestricted access to your host's Docker, which can pose security risks if not adequately shielded. If the machine is solely utilised for running SubQuery services, Node Operators should contemplate applying specific Docker security measures. Refer to documentation on SeLinux or AppArmor for further insights.
Other Best Practices
- Regularly update the host OS.
- Ensure the SubQuery service softwares are upgraded to the latest versions.
SSL Certificate Configuration
SSL certificate is an important way to secure your Node Operator service and encrypt traffic between your query service and the Consumers requesting data from it. It's a good idea to obtain an SSL certificate for any professional service and SubQuery is no different. Additionally, a SSL certificate is required for when a Consumer access a website via SSL and that website is requesting data from your SubQuery project.
Since it's such a standard best practice, although it's not required, we rank Node Operators higher in the Node Operator leaderboard if they have SSL enabled. You can tell if a Node Operator has SSL enabled by confirming that the Proxy Server Endpoint in Node Operator's metadata starts with https instead of http.
1. Purchase a domain name
You can purchase a domain from a lot of domain providers, we won't be providing a guide on how to do this. The rest of this guide assumes you have purchased mysqindexer.com
2. Config DNS
Add a A record to your domain that points to your Node Operator's server IP address. For example, we add an A record for proxy.mysqindexer.com to our server's IP 210.10.5.61.
3. Get a SSL Certificate
You can get a free SSL Certificate from Let's Encrypt, they offer a lot of ways to get a SSL certificate, you can choose the one that fits your needs. This tutorial will use Certbot + NGINX + Ubuntu as an example.
3.1. Install Certbot: Check https://certbot.eff.org/instructions on how to do this step 3.2. Install Nginx: We will use nginx for two purpose.
- Listen on port 80 to allow Let's encrypt to verify your domain name.
- As a reverse proxy to forward traffic from port 443 (https) to
indexer-proxy.
sudo apt install -y nginx3.3. Reconfig indexer-proxy: In the default settings, indexer-proxy listen on port 80, now we need to change it to 1080.
# docker-compose.yml
proxy:
    image: subquerynetwork/indexer-proxy:v2.1.0
    container_name: indexer_proxy
    restart: always
    ports:
      - 1080:1080
    command:
      - --port=1080
      - --auth
      - --network=mainnet # network type, need to be same with coordinator
      - --jwt-secret=<a random str> # change to any random string value
      - --secret-key=<a random str> # keep same with coordinator secret key
      - --coordinator-endpoint=http://indexer_coordinator:8000
      - --network-endpoint=https://mainnet.base.org # network endpoint, can choose your own endpoint
      - --token-duration=24 # query auth token validity [hours]
      - --redis-endpoint=redis://indexer_cache
      - --metrics-token=thisismyAuthtoken # change to any random string value
then restart the indexer-proxy container
docker-compose up -d3.4. Config Nginx: Edit your Nginx configuration (usually found at /etc/nginx/conf.d/proxy.mysqindexer.com.conf, create one if it does not exist) to add the following:
# /etc/nginx/conf.d/proxy.mysqindexer.com.conf
server {
    listen 80;

    server_name proxy.mysqindexer.com; # update the server name to match your DNS address

    location / {
      proxy_pass      http://127.0.0.1:1080;
    }

}
4. Run Certbot
# run certbot
sudo certbot --nginx -d proxy.mysqindexer.com

# output
# Saving debug log to /var/log/letsencrypt/letsencrypt.log
# Requesting a certificate for proxy.mysqindexer.com

# Successfully received certificate.
# Certificate is saved at: /etc/letsencrypt/live/proxy.mysqindexer.com/fullchain.pem
# Key is saved at:         /etc/letsencrypt/live/proxy.mysqindexer.com/privkey.pem
# This certificate expires on 2023-08-06.
# These files will be updated when the certificate renews.
# Certbot has set up a scheduled task to automatically renew this certificate in the background.
#
# Deploying certificate
# Successfully deployed certificate for proxy.mysqindexer.com to /etc/nginx/sites-enabled/proxy.mysqindexer.com
# Congratulations! You have successfully enabled HTTPS on https://proxy.mysqindexer.com
#
# - - - - - - - - - - - - - - - - - - - - - - - - - - - - - - - - - - - - - - - -
# If you like Certbot, please consider supporting our work by:
#  * Donating to ISRG / Let's Encrypt:   https://letsencrypt.org/donate
#  * Donating to EFF:                    https://eff.org/donate-le
# - - - - - - - - - - - - - - - - - - - - - - - - - - - - - - - - - - - - - - - -
4.1 Edit the Nginx config with a new SSL certificate and open port 443:
server {
  listen 443 ssl;
  listen [::]:443 ssl;
  ssl_certificate /etc/letsencrypt/live/proxy.mysqindexer.com/fullchain.pem; # the path generated by certbot
  ssl_certificate_key /etc/letsencrypt/live/proxy.mysqindexer.com/privkey.pem; # the path generated by certbot
  server_name proxy.mysqindexer.com;

  location / {
        proxy_pass http://localhost:1080;
  }
}
5. Enable HTTP2
It's important that you enable HTTP2. This significantly improves query performance across the SubQuery Network, and will likely be required at some point in the future.
To enable HTTP/2 in Nginx, you must first ensure that you are running Nginx 1.9.5 or newer, as HTTP/2 support was introduced in this version. You also need to have SSL/TLS enabled because HTTP/2 in Nginx requires HTTPS due to browser support requirements.
To enable HTTP2, modify your Nginx Configuration:
- Open your Nginx configuration file (typically located at
/etc/nginx/nginx.confor within the/etc/nginx/sites-available/directory). - Find the server block for your HTTPS configuration.
- Add the
http2parameter to the listen directive that specifies the SSL port (usually 443). For example:
# /etc/nginx/sites-available/proxy.mysqindexer.com
    server {
      # add http2 to line below
      listen 443 ssl http2;
      ...
    }
Before applying the changes, test your new Nginx configuration by running nginx -t. If the configuration test is successful, reload Nginx to apply the changes with sudo systemctl reload nginx or sudo nginx -s reload.
6. Update your Node Operator metadata
Set the Proxy Endpoint to https://proxy.mysqindexer.com
Community Solutions
There are a number of community built tools that you can use to help your SubQuery Network experience. Feel free to contribute your own.
Warning
Please note that none of these tools have been endorsed by the SubQuery team and descriptions have been written by third parties. This section is open for contribution by all.
Please research and use at your own risk
Node Operator Toolkit (by web3cdnservices)
This tool contains everything you need to index, monitor and properly access for you from any device
What it does
- Extended monitoring of all Node Operator parameters, sync time, balances, issues. Metrics also support Alerting rules
- You will always know about the problems that have arisen through monitoring and do not miss the reward.
- Makes your Node Operator and infrastructure secure
- Ease of updating without the risk of changing important parameters
- Secured access to dangerous zone with your own VPN, Access from mobile devices to monitoring, and internal services in any time.
- Very easy installation and user error protection
Links